I have to thank my old friend Connie, whom I met while working for KPMG Peat Marwick in Denver a couple of decades ago (OK, just shy of that). She was Ms. Super Crafter and taught me how to make beautiful pinecone wreathes without wire, handtools, or injuries!
Now, I will teach you ...
You will need:
A bag of pinecones (take your time and have fun at a park, cemetery, or someone's yard as you gather them - be sure to get a good mixture of sizes, types, and condition - you want old gnarly ones and ones not opened and perfect ones and ALLLLL types)
An electric skillet (the cooled glue comes right off, or you can dedicate an old one to crafting)
About 15 large glue sticks (like you use in a hot glue gun)
A hay wreath, wrapped in plastic (leave the plastic ON). There are two sizes. I prefer the smaller size because I like to enjoy my wreathes indoors. The larger size is great for a wreath to be used outdoors.
Some wire for making a hanger
Spray acrylic sealant
Spray acrylic sealant
Table covering (those plastic-covered-fabric tablecloths meant for picnics work great)
Here we go:
Spread the tablecloth on a large table.
Plug the electric skillet in and set it to about 325 degrees.
Drop the 15 glue sticks into the skillet to melt.
WARN ALL CHILDREN TO STAY AWAY. The glue is scalding hot.
Place your hay wreath in front of you on the table.
Select small cones to go inside the hay wreath.
Select large cones to go around the outside of the wreath.
Select medium cones to go on top of the wreath.
You can lay out the cones on/around your hay wreath to plan out whether you have enough.
Move the 3 sizes of pinecones to 3 piles to the side of where you are working.
You are ready to glue. THE GLUE IS HOT. If you touch it, you will get burned. Be careful.
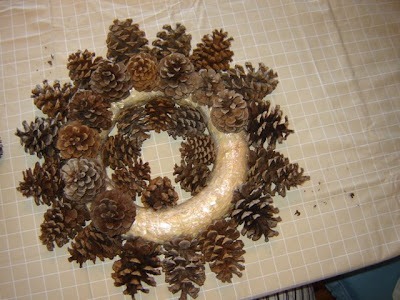
Take the small cones and dip each one lightly in the melted glue and hold it in place on the inside of the wreath until the glue cools. Work your way around until all the small cones are in place.
Pick up the project and make sure it is not glued to the table. :-) Do this periodically.
Now move to the outside of the wreath, and glue each large cone to the outside edge, working your way around the entire outer circle.
Remember to pick up the wreath to be sure it is not glued to the tablecloth.
Now glue the medium sized pinecones all around the top of the hay wreath.
Once the foundation of these 3 circles of sizes are done, you get to be creative!
Glue whatever smaller pinecones seem right to you, as you work all over the wreath and fill in the gaps. Be sure to glue some cones upside-down and on their sides. Use the ones that are old and decayed and gray. Use the ones that are mostly eaten by the deer. The more variety you can use, the more beautiful and interesting your finished wreath will be.
Your goal is to NOT be able to see the hay wreath anymore. Once you have accomplished that, you are finished gluing and can unplug the electric skillet of glue.
If this is your skillet for cooking, the remaining glue can be easily removed once it has cooled by lifting gently at an edge and prying up the sheet of cooled glue.
Decide where the top of your wreath is. Work your wire for hanging around the hay wreath base, by carefully threading/working the wire in-between the cones. Twist the wire and make sure the part that touches your wall will not scratch it.
You can now give your wreath several coats of spray clear acrylic. Do this with GOOD ventilation outdoors or in your garage. Allow it to dry thoroughly between each coat. The acrylic will give the wreath more strength and will also kill any remaining tiny bugs.
Oh - Did I mention that it is NICE to have a small vacuum cleaner with you as you work in order to suck up the bugs and spiders that may appear out of the pinecones? I am always amazed that there are ALWAYS critters in there, even in the cold winter months!
You could add a bow, if you like. You can also glue on small needle sprigs, if you like (they will eventually dry out and fall off). I prefer my wreaths with pinecones only.
Here is a photo series of the process:


1 comment:
Wow! That is beautiful! I'll have to find somewhere to get pinecones though, they don't grow in Dallas!
Thanks Martha Stewart!
Post a Comment